







An achy lower back can make everyday movements feel way more difficult, including getting up from the floor and even putting on your seatbelt. And your regular exercise routine can take a hit too, since lacing up to move your body can seem not-so-appealing when your back is bothering you.
But staying sedentary can actually make it worse. Movement ushers blood flow and oxygen to your muscles, which can help reduce stiffness and turn down the signals of discomfort from your brain, Lara Heimann, M.S. in physical therapy and founder of LYT Yoga, tells Prevention.
While any kind of movement can be helpful, paying extra attention to your hips can bring even bigger rewards. Read on for the link between your hips and your back—plus two short sequences of moves that can help you feel better.
How Tight Hips Can Lead to Back Pain
When your back is bothering you, it’s natural to laser focus on that particular area for relief. But in many cases, the trigger may come from elsewhere on the body.
Think of it like stacking a bunch of books. “Each book is separate, but together, they form this chain,” says Heimann. Each book is dependent on what’s going on above it and below it—the integrity of the whole stack can be thrown off if something’s amiss with just one of them.
Your pelvis, and the hip muscles that attach to it, are like the center of the stack. They play a huge role in the transfer of energy that allows you to move, Heimann says. So “if some area is not functioning well—because of a lack of mobility or not enough stability to resist excessive movement—that can create kind of a speed bump in that conduction of energy,” Heimann says.
Tightness in your hip flexors can, specifically, contribute to an anterior pelvic tilt, or the forward rotation of your pelvis that makes your lower back arch. In some people, this can cause lower back discomfort by increasing compressive forces on the back of your spine, says Heimann.
The tightness and instability that shifts your pelvis out of alignment can also affect how it moves during everything from rising to stand up to walking to working out at the gym. This change in position makes it harder for the muscles that should be working to do their job; as a result, your lower back often steps in to pick up the slack. Problem is, your lower back muscles are not made to do the work of your hips.
“The hip muscles are big—they’re generating force, they’re generating movement,” Heimann says. “The low back is made to support the movement we make with our bigger joints.”
So when your lower back has to step in to try to complete a movement or keep you stable, it can become overloaded. This creates stress and tension, which you can feel as aching, tightness, or discomfort.
People can develop “habitual compensations” that can reinforce these patterns, says Heimann. Spending lots of time sitting—without taking breaks to move in different ways—makes up a common one. The deep, stabilizing muscles in your hips and your core can become muffled and less responsive, leaving your pelvis with less support to resist motion that can knock you off balance, she says. This encourages your lower back to step in even more, which can create a cycle of pain or discomfort.
While many people equate their back pain to simple tightness, it’s actually more of a combo of actions (or inactions): limited mobility that hinders proper hip extension (leg extending behind torso), problems stabilizing your hips, pelvis, and lower back during movement, and weakness or lack of endurance in your glutes, says Heimann.
The key to combating tightness is dynamic movement—not static stretching, or when you get into a position and hold it—that works to both improve mobility and stability, particularly in your hip abductors (the muscles that pull the leg away from the center of your body), including the glutes, says Heimann. Strengthening your core is vital too, because it further stabilizes your spine and helps keep it in its proper positioning.
The following two sequences do just that; try to do this combo once every day, focusing more on small, quality movements, rather than speed or an overextended range of motion, Heimann says.
Sequence 1, 1 Round
Bridge variations primarily hit the largest muscle in your butt called the gluteus maximus and train hip extension, or the movement that brings you up from a squat. It’s an important movement pattern, because if you don’t have adequate hip extension, your brain calls upon the close-by muscles in your lower back to come in to compensate and finish the movement.
Each move in this sequence gets progressively harder; the single-leg variations also fire up your hip abductors, which play a key role in stabilizing your pelvis when you walk, run, or climb stairs.
If either of the two progressions are too difficult, stop after the last move you’re able to do comfortably and with proper form, and head on to Sequence 2.

Add Prevention as a preferred source in your Google search results.
Use your Google account to add this to your settings.


Do the exercises back-to-back, flowing from one to the next.
1. Bridge Pose

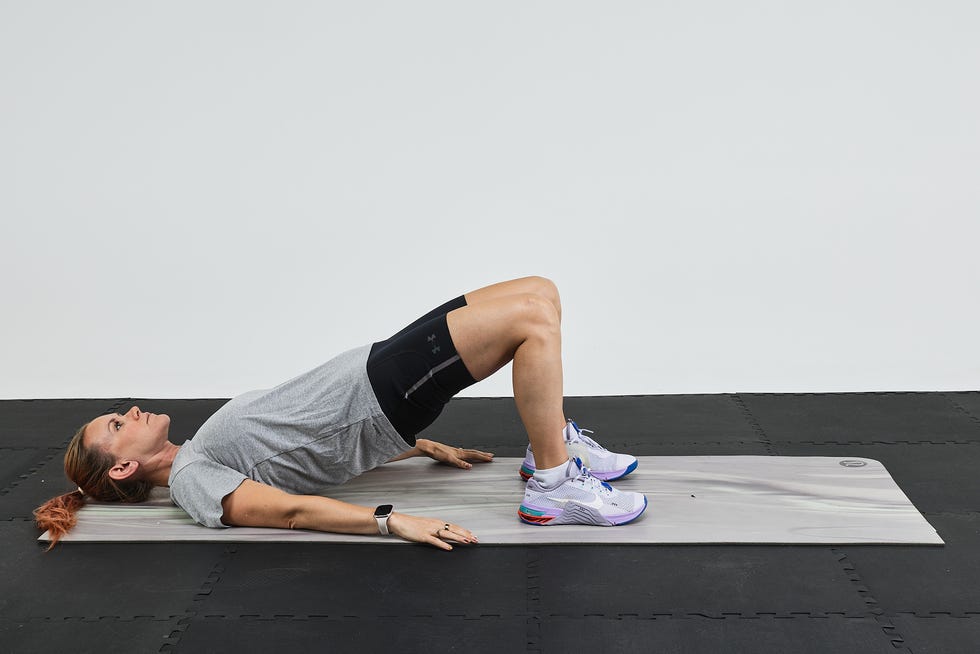
- Lie faceup on a mat with knees bent and feet on the floor hip-width apart.
- Drive through heels to slowly lift hips off the floor. Place hands on pelvis; if they start to tilt toward your feet, that means lower back is arching. Focus on keeping the movement small and feeling glutes fire rather than trying to lift butt up high.
- Slowly lower hips back to the floor.
- Repeat, continuing for 1 minute.
2. Single-Leg Bridge Hold
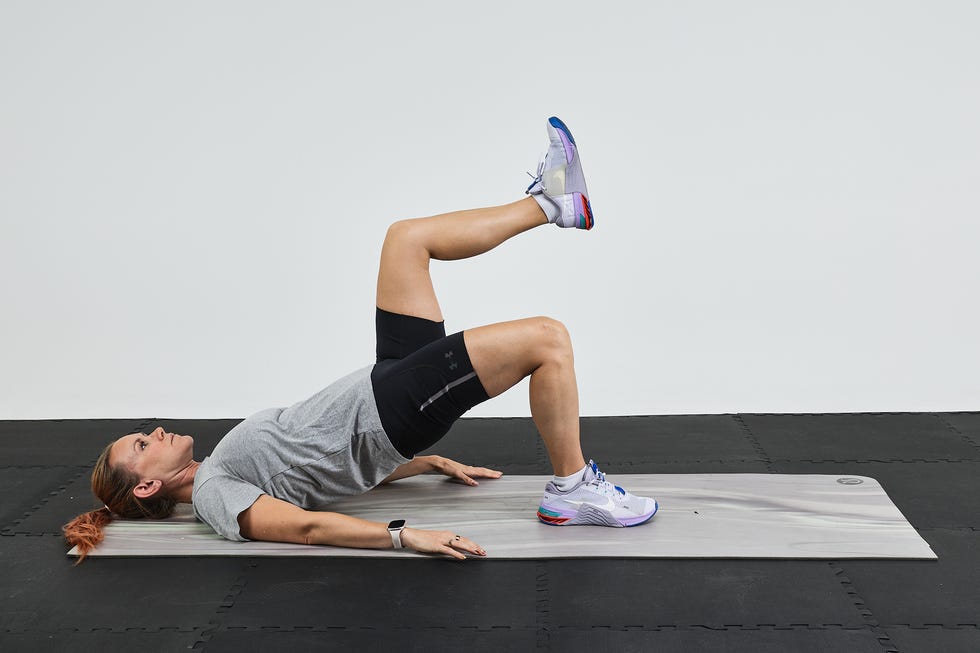
- Lie faceup on a mat with knees bent and feet on the floor hip-width apart.
- Slide left foot a little closer to center. Lift left leg so knee is over hip; thigh and shin should make a 90-degree angle.
- Push through the heel of right foot to lift hips off the floor.
- Hold that position for 10 seconds.
- Slowly lower hips back to the floor.
- Switch sides and repeat.
3. Single-Leg Bridge
- Lie faceup on a mat with knees bent and feet on the floor hip-width apart.
- Slide left foot a little closer to center. Lift left leg so knee is over hip; thigh and shin should make a 90-degree angle.
- Push through the heel of right foot to lift hips off the floor.
- Slowly lower hips back to the floor.
- Repeat for 5 reps.
- Then repeat on other side.
Sequence 2, 2 Rounds
This two-move combo builds on the hip extension you did from the floor in Sequence 1 and adds a hefty dose of deep core stabilizing and strengthening, which also plays a huge role in stabilization and the prevention of lower back pain.
Do the exercises back-to-back, flowing from one into the next. Go for two rounds with as little rest as possible between.
1. Tabletop Bird-Dog With Hip Extension
- Start in tabletop position with hands and knees on the mat, wrists stacked under shoulders and knees under hips. Keep back neutral and avoid rounding shoulders.
- Slide left leg back as if you were going into a high plank, keeping left toes on the floor.
- Slowly lift left foot a few inches off the floor. The movement should come from left hip; nothing else should be moving.
- Lower foot slowly back to the floor.
- Repeat for 10 reps. For a greater challenge, after your 10th rep, do tiny, 1-inch pulses for 20 seconds.
- Then repeat on the other side.
2. Side Bridge
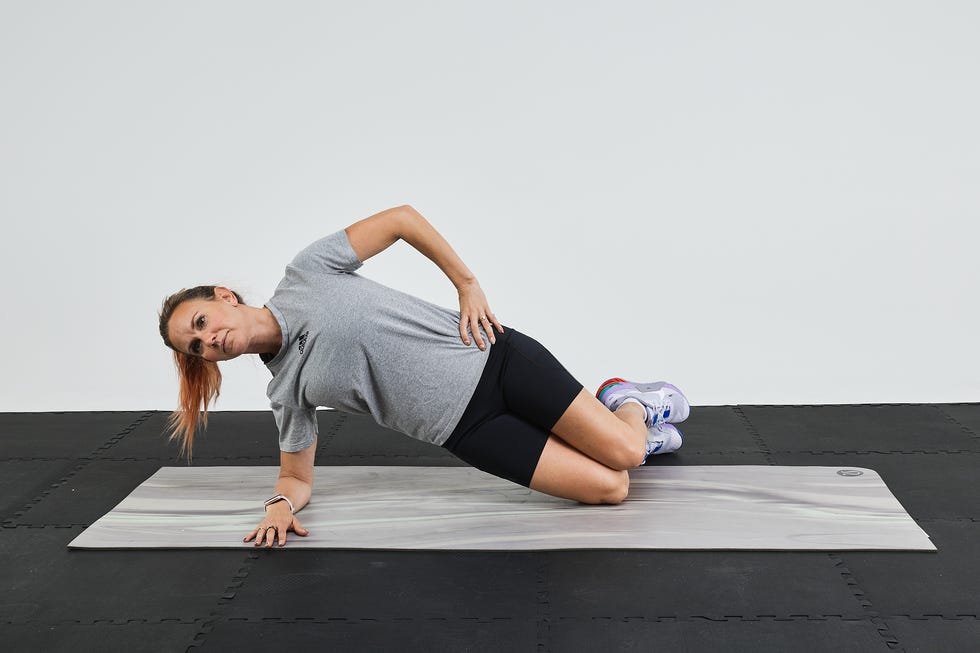
- Lie on right side with knees bent and stacked on top of each other. Right elbow should be directly under shoulder with right forearm extended and pressed into the mat.
- Push into the floor with right forearm and right leg to raise hips off the ground. You should feel this in the side of right hip and the deep core muscles and obliques on right side.
- Reverse the position to slowly lower right hip back to the mat. “Pretend like there’s an egg underneath your hip that you don’t want to squish,” says Heimann. (If this is too difficult, place left hand on a yoga block in front of you to make it easier.)
- Repeat for 20 to 30 seconds.
- Then repeat on other side.
Read the full article here


